WebIO 7
Quick Start Guide
This guide will take you through the steps to quickly get your WebIO7 up and running on your network.
This guide is also available in PDF: KE_WebIO7_QuickStart.pdf
1. Connect WebIO7 to Ethernet network and Power.
From the WebIO back panel, plug-in to your Ethernet network using a CAT5/6 Cable. Plug-in the supplied 12Vdc power supply, or a compatible power supply, supplying 12vdc center pin positive and capable of supplying 500mA.
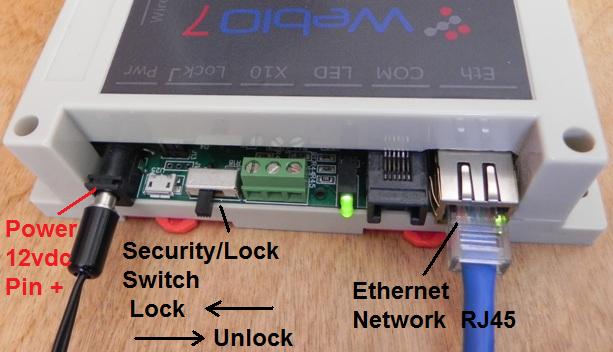
WebIO7 back panel
2. Browse to WebIO7 internal web server
If your network router provides DHCP service, WebIO7 will receive a network address. If your computer supports NetBIOS you can then open an Internet Browser and enter the WebIO7 default host name of “webio7/” as the browser URL/address.
WebIO will respond with a Login Page as pictured. Default User name is “admin7”. Default Password is “76543”

If locating WebIO7 internal web server by Host name “WebIO7” does not work, you can use the following methods of connecting:
- Locate WebIO7 by MAC address in your routers “connected devices table”. WebIO MAC address is printed on a sticker located on its bottom side.
- Use the WebIO7 service tool Windows software application (below).
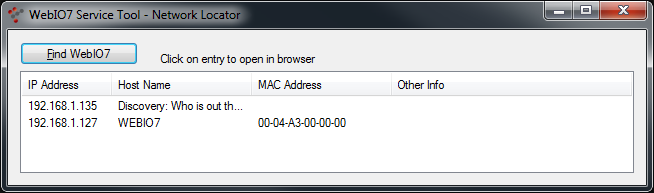
The WebIO7 Service Tool is used to locate WebIO7 units on your Local Area Network.
When found you can then browse to the IP address associated with WebIO7.
In the example image above, you would use an Internet browser and enter address 192.168.1.127 in the address bar.
The WebIO Service Tool is available for download at www.webio7.com
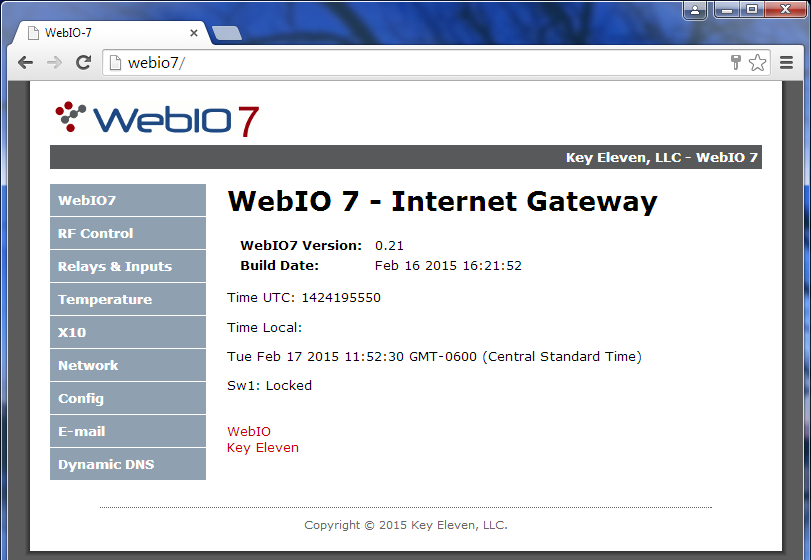
3. WebIO7 internal web server Home Page
Once you are logged into WebIO7 you will see the WebIO7 Home page.
4. Configure WebIO7 Settings
Important WebIO7 settings include Network IP address and Username/Password.
Setup WebIO7 to be Internet routable
So that you can connect to WebIO7 from the Internet you may want to assign a static IP address to your WebIO7. This allows you to forward a port (e.g. port 80 or 8080, etc) in your router to the WebIO7 static IP address (a user defined IP address that does not change).
Another method would be to setup the router with your WebIO7 MAC address and a user defined IP address,
such that the router will always assign the IP address to WebIO when it is powered up on the network.
This is method is equivalent to a BOOTP service, rather than DHCP.
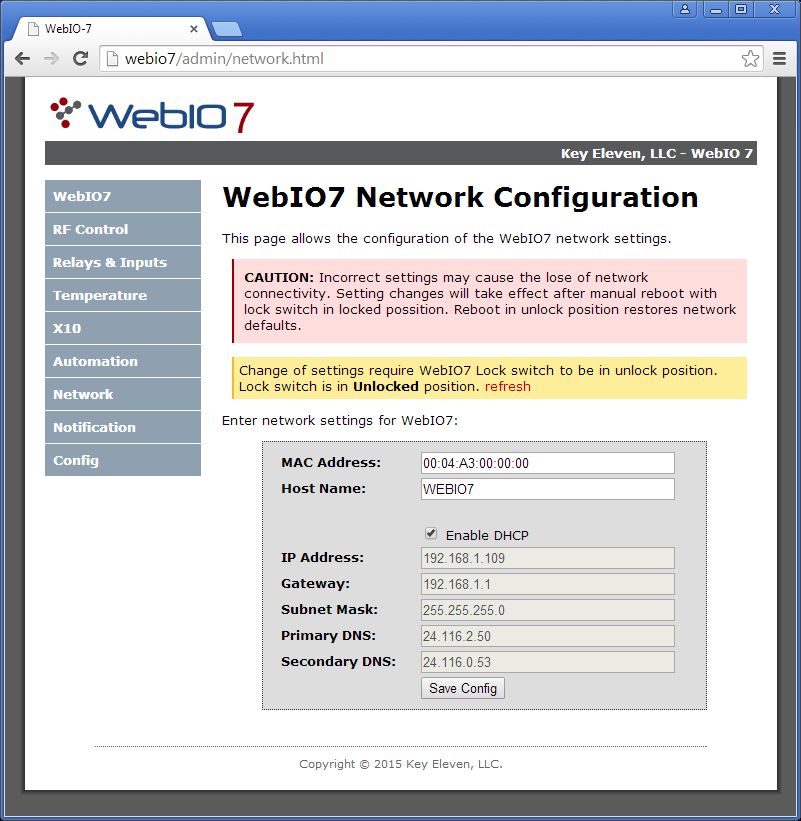
Instructions to assign static IP address to WebIO7
- Connect to WebIO7 internal web site and find the Network Page.
- Uncheck “[x] Enable DHCP” to disable the WebIO7 DHCP client (so it does not get network settings from your routers DHCP service.
- Enter a IP address. This IP address must fit within your subnet.
- Your router may require that static IP address is outside the range of its DHCP pool of address. For example, if your network mask is 255.255.255.0 and your router gave WebIO7 an IP of 192.168.1.109, and you checked with your router to find that it hands out IP address (DHCP) in the range of 192.168.1.2 – 192.168.1.100, then you may want to set a static IP of 192.168.1.101 just outside the DHCP pool and still within the network 192.168.1.x.
- You may want to leave the other network settings as given by your DHCP service.
- If you have more than 1 WebIO7 on the network you will also want set the Host Name of each device so that they are different.
- Note that in the screen shot (right), the Internet browser connected to WebIO7 by it’s host name “WebIO7” as you can see in the browsers address bar.
Save WebIO7 Network Settings
WebIO7 requires its Security Switch located on the back panel to be in the unlock position before saving network settings. Also the network settings changes will not be applied until WebIO7 is rebooted. You must place the security switch back to the Locked position before rebooting WebIO7 otherwise it will restore its network settings (along with passwords) back to factory defaults.
Also note that the after selecting [Save Config] button to save your network settings, the page will refresh with the settings that are currently used and not your newly changed settings, which get applied after a reboot.
5. Factory Defaults
To restore WebIO7 to its factory defaults, place the WebIO7 security switch located on its back panel (see picture in first section of this document) into the Unlock position and then power off and on WebIO (reboot). Now place the security switch back into the Locked position.
The security switch provides extra protection of important WebIO7 settings from ever being changed by an unauthorized user. You must physically unlock WebIO7 to change most configuration settings such as network settings, user passwords, assigned device labels, etc.